Here's my spring vignette on my new buffet I purchased for my birthday.
I love apothecary jars and all the possibilities they hold.
Right now mine are holding a shabby bird (found at the thrift store) on top of some moss, and green and brown speckled eggs leftover from Easter. I also added some vintage looking tags for extra appeal.
I have a couple of cake stands,one with a birds nest filled with eggs, and one with a bird plate I recently found at a local boutique.
I also have my two buffet lamps purchased years ago from Pier 1, which I still love. I placed an oval mirror in the middle and a small birdcage I found for $3 at Roberts.
I think it feels very springy--I just wish the weather would cooperate.
Wednesday, May 19, 2010
Thursday, May 13, 2010
Shabby Pillow Revamp
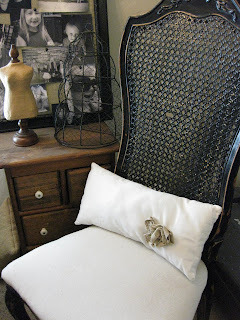
Her is my version of the fabric flower pillow seen all around blogland.
I repurposed an old pillow cover from Ikea that was half red and half white. I cut it so I had a rectangular shaped pillow out of the white side and sewed it up.
I then took some leftover tan muslin, cut it into strips 2" wide. I then rolled and twisted the strip around and around itself to form the flower. The two smaller flowers were made with a slightly smaller strip of fabric. Once I had the flowers formed I sewed it a little bit to hold everything in place. The flowers are each a little different, which just adds to the charm of the pillow. This was a very quick and fun project. I love how it adds just a little bit of feminine frill to my sewing corner.
Chandelier Canvas
I loved the Chandelier canvas seen in the Ballard Designs Catalog but was not willing to pay the price, so I decided to make my own.
I found a large canvas mat at the thrift store that was the right size. It already had a design on it but I knew I could easily cover it up with spray paint.
I painted it cream and then stuck on my vinyl sticker stencil found at Roberts. I used a dry brush paint method, using black paint and also walnut wood stain, and covered the entire canvas (including the sides). Then I peeled off the vinyl sticker, and there it was, my very own Chandelier Canvas.
The best part is I only spent about $15 on the whole project, compare that to the $300 bucks they wanted at Ballard. You gotta love that!
Wednesday, May 12, 2010
Bathroom Beadboard Project
I forgot to take before pics again, I guess I was just so excited to get started. I wanted to give our master bathroom a little more character with some beadboard and wide trim.
I originally painted it white but then I decided on painting it cream and added some walnut glaze so the beadboard really pops.
I kept the trim white and added some hooks for towells which is the smartest thing I've ever done. No more folding and refolding the towells so they fit perfectly on the two foot long towell rack. It takes about a nano second to hang up your towell and it always looks great.
I also added some of the same wide white trim around the plain windows. Then I added some glass knobs on either side of the windows to hook the strings that normally hang down from the blinds into the bathtub.
This was actually pretty fun and not very hard to do. I love the character beadboard adds to any room and aleady have plans to do some more in a different room.
Shabby Chic Buffet
Drab to Shab Coffee Table
I need to remember to take before pics so you can see the awesome transformation. This was a blah pine coffee table we purchased in the 90's. Back then I loved the look of pine and bought a lot of it. Now my husband says I paint everything black or white. I was going to paint this cream but decided on white with a very heavy distressing which actually made it turn out more cream than white. After painting it white, I heavily brushed on a walnut stained then wiped off with a wet rag. I made sure to get it into the dings, scratches, and edges for a very distressed look. As you can tell, this is an interesting coffee table in that the top raises up so you can use it as a table when you are sitting on the couch. Its great for homework or eating in front of the t.v. I actually was ready to get rid of this before I finished it but my husband wanted to keep it. I decided to refinish it and now I am glad we kept this. I love how this turned out.
Monday, May 10, 2010
Shabby Chalkboard and Hooks
This sign is perfect for a day like today! It is mid May but still feels a little like winter, ugghh! It has been a cold and rainy spring and so I'm hoping this sign will give Mother Nature a little encouragement, meaning kick it in gear, and bring spring already!
This chalkboard was made from a fun frame found at a thrift store. I painted it white and then used a piece of plexiglass, fit to size, and painted it with chalkboard spray paint.
I also found this charming hook rack at a local consignment store. I think it is perfect to show off our cute aprons.
At least it is starting to look a little like spring {inside} the house.
Numbered Barstools
These were another fun thrift find. They were originally all different colors so I painted each with 2 coats of black paint. Then I made a number stencil out of freezer paper. I place the freezer paper up against the computer screen where I had chosen and enlarged the style of number I was going for. I traced the number and then cut it out carefully. I then taped the number onto the top of the barstool and carefully traced and then filled in with cream paint. They were then topped with a clear coat.