I thought a vintage sheet music wreath would be a perfect addition to my evolving piano room. This one turned out similar to my first book page wreath. It was a very fun and addicting project, made with supplies purchased from either the dollar or thrift store. Total cost= $5!
Here's what you need:
{foam wreath
{cream ribbon
{glue gun
{vintage sheet music
{masking tape
{a small cup
That's it!
Let's get started.
You could use any size foam wreath but the only one the dollar store had the day I went was this really wide one, so...
I just cut it right in half with a knife.
If you buy a thick one like me, just save the other half for when you want to make another book page wreath. Trust me you will--they're addicting.
Wrap the wreath with a wide ribbon, glueing occasionally as you go. Or you could skip this whole step, especially if your wreath is white or cream.
This one was made out of florist foam and flaked every time I touched it so I definitely wanted to wrap it.
Now tear out about 50 pages of vintage sheet music. This is where it gets really fun. Once you get the idea of how to form each sheet into a cone shape it goes really quick.
This is how you do it:
Take a sheet and place your fingers on the two corners on the long side of the paper.
Keep your left hand still and with only your right hand wrap that corner around
continue to wrap in a forward motion
twist
twist
twist
keep twisting
Now twist your left and right hands in opposite directions to tighten the cone.
You can twist a lot to make a skinnier cone
or twist less and leave the cone opening bigger. Then secure with a small piece of masking tape.
I used a combination of skinny and big ones.
Once you have a big pile of these you are ready to glue.
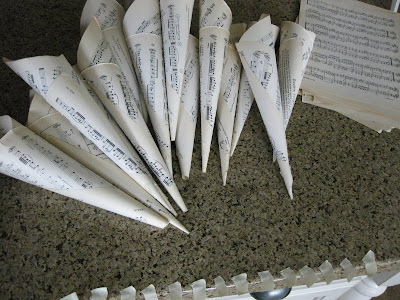
Put your cup right in the middle. This will help you get a nice size circle opening in the center. You can vary the cup size depending on how big or small you want the opening to be.
Go all around the wreath hot glueing a single layer of cones to the wreath form. Don't worry if there are spaces or if it doesn't look perfect, this layer will be covered up.
Continue with a second layer.
Hang using a piece of ribbon or fabric threaded around the back of the wreath form.
Right now my wreath hangs simply from a small nail but I envision it one day hanging in the middle of a shabby door or gate hung just above the piano.
Saturday, September 25, 2010
Monday, September 20, 2010
Numbered Drawers
My sons' dresser got a little makeover this weekend.
Here's what it looked like before. I liked the existing color but it just needed a little something.
I wanted to add some number detail similar to what I found in an old Anthro catalog.
I used some letter stencils from my scrapbooking stash for the "st" etc. I used my homemade number stencils from this project but then realized the numbers were too small and getting lost in the whole look. I needed them bigger but was feeling too lazy to have to go make new ones.
I decided to just freehand some larger numbers in pencil first, then filled it in with black acrylic and a small paintbrush.
Once I got everything painted, I made sure it was completely dry and then went over everything with fine sandpaper.
The sanding gave it an aged feel and helped to conceal the boo boos I made when painting.
A little bit of paint and an hour's worth of time really added a lot of character to a room that just needed a litttle "something".
Master Bath update
Remember my master bathroom beadboard project I did here. I decided to add a little picture ledge to the top so I could put up these chandelier tins I've had for quite some time.
All I did was add a 2" piece of wood on top of the trim that was already there and then added some "L" trim to that using my handy dandy new nail gun I purchased for this board & batten project.
This is the wall opposite the toilet. This cool hand mirror is from the thrift store, I just added some ribbon so I could hang it from the hooks.
I was so excited to find these tins at a local consignment store for only a few bucks each, especially since I had seen them at a furniture store for $50--what?!?
I also added this cute clock I won at Bunco a few months ago.
I love these ruffle towells from Target, although they are a little scratchy (at least the ruffle part) but they are sure cute!
Thursday, September 16, 2010
Not too shabby shelves
Tuesday, September 14, 2010
$3 Book Page Wreath
I've been wanting to try my hand at one of these wreaths for some time. And what better way to say fall than a unique wreath made from pages torn from a book.
I am so not ready to decorate for fall--at least with orange and black. Everywhere I go I'm seeing pumpkins and orange. My neighbor down the street even has a witch already on her porch--good grief!
Fall is the beginning of school and the perfect time to curl up with a good book as the air starts to turn crisper. (I just finished a good book, "Mockingjay"--the end to one of my favorite series of books.)
The best part about this project is that everything came from the dollar store, and the whole thing cost me $3.
I found a foam wreath core ($1), wrapped it with cream ribbon ($1), and took pages from the perfect sized book ($1)= $3 total. I tore out about 80 pages and twisted them into a cone shape, secured with a small piece of tape on the back. Then I hotglued each one on, making about 3 layers of cones. This was a really quick project and I'm ready to make another one. I found some vintage sheet music yesterday at the thrift store that would make an awesome wreath, similar to the one Miss Mustard Seed has. I'll be sure to post a tutorial when it's finished.
I also recently finished this "ghost" lamp to put in my pianoless piano room--that's 'fall'ish, right?
Thursday, September 9, 2010
Board & Batten
I have been dying to do this board and batten technique in this room for months but it has been the temporary home for my husband's office, full of bookshelves and a big desk. But after 1 week, 2 changes in plans, and 3 different shades of white paint, it's finally done.
I wanted to add a little character to the room to match the rest of the house. I love the wainscotting in my front entry,
and the trim and windows in my dining/kitchen area.
I ended up going with 5' vertical slats that were 1 1/2" wide, and 3 1/2" horizontal ones. I cut a 45 degree angle at the bottom of each slat so that they would slowly angle to the baseboard width. After 3 different cans of white paint I finally got the perfect match, swiss coffee. It matched the existing trim and baseboard color, so I didn't have to repaint it all.
Now it was time to decorate. I pulled out my really old Pottery Barn slipcovered couch that's been sitting in the garage. I found this end table/file drawer at the thrift store. It reminds me of recent Restoration Hardware catalog wares with the rustic hardware and bookplate detailing.
I pulled out these pillows purchased at Restoration Hardware that I've been storing in my closet.
They have a french inspired theme with a feed sack look, without all the itchiness.
This room will be our piano room as the kids are beginning piano lessons. Now I just have to find a piano.
Subscribe to:
Posts (Atom)