Monday, November 29, 2010

Vintage Cone Ornament

Here's a peak at my Christmas tree. 
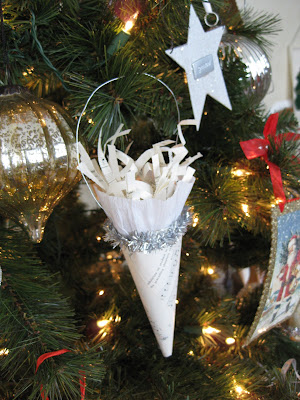
Lots of cream and silver with a touch of red.

A handmade vintage Christmas cone: simple & quick.


Now that Thanksgiving is over, its time to start decorating for Christmas. I love to make some homemade ornaments every year. Growing up, our Christmas tree was filled with mostly homemade ornaments, made by either my mom, or the ones made by us kids at school. I love having homemade ornaments on the tree mixed in with the store bought kind.

Last year I changed my Christmas tree into a "vintage Christmas" theme. So it is somewhat bare and needs more stuff. I'll be getting busy filling it up. Here is idea #1:


These cones are a takeoff on the vintage sheet music wreath I completed just a few months ago. Just twist a sheet into a cone, embellish with some dollar store trim, and fill with even more sheet music (shredded this time). Hang with some wire and you're done!


Here it is step by step if you want to make some for yourself:

twist into a cone,

cut to make a flat top,


gather a strip of white crepe paper,


hot glue onto the inside of the cone,


add dollar store trim,


Simple, yet sweet, just the way I like 'em!


Wednesday, November 24, 2010

Happy Thanksgiving!

Here's one last look at Thanksgiving before everything gets puts away and Christmas appears.


This fun banner is from moselle.co. I found it by accident one day when I was browsing blogs. They offer a free printable thanksgiving banner that is super cute. I had to tweak it a little bit because I only have a black & white printer but this ended up being more my style with the neutral colors anyway.

I added burlap, crepe paper, and old book pages.
I made a little nest out of burlap fabric scraps to put in the cone with the squirrel design. I thought it would be cute to add some acorns or small pine cones to the nest, but at the moment we are in the throngs of a blizzard, so maybe next year.

I love the fancy lettering.


Happy Thanksgiving!

Saturday, November 20, 2010

Cute Holiday Cards


Remember when I was talking about getting my Christmas cards done early this year. I was checking out different sites and the cards they offer. I checked out Sam's Club (who I have purchased from in years past), Walgreens, even tried to make my own cheaper version on Picnik but the one I really want is from Shutterfly.

My sister-in-law took our pictures about a month ago and I liked quite a few of them and just couldn't decide which picture to use. In the past I've bought the inexpensive ones with 1 photograph but this year I wanted to do more of a collage effect with many photos.

These are some of my favorites. I'm trying to decide between the "many memories tree' card and the 'peppermint pink' card. If you usually include a family letter with your cards then check out the 'christmas letter' card--it combines a cute photo card with a family letter.


I loved the ease of the Shutterfly system, especially when dealing with a card with multiple photos. You can easily drag and drop pictures, move them around and crop right on one page--something that left me very frustrated at the other sites I visited.

One day as I was doing my usual blog browsing I came across a project done by dreambookdesign.com and as I was skimming her blog I found this great deal. It was just what I needed to find. If you have a blog and want to take advantage of this great promotion to get your own free Christmas cards from Shutterfly check it out!

Thursday, November 18, 2010

Another chair


I'm on a white chair kick, here is chair #2.
I would love to eventually have 6 different white chairs to replace the black ones at my dining table. (Remember my first chair?)


I don't have a before picture, but it was a dark brown wood with boring fabric seat cover. I painted it white and distressed the edges with a sander.
Then I made my own faux postal sack by using a plate, bowl, acrylic paint and paintbrush, a scrap of muslin, and some letter & number stamps from my scrapbook stash. I traced the plate and bowl for the circle and stamped the letters and numbers with the acrylic paint. Then added squiggles to give it that authentic vintage postage stamp look. I then washed the material in the washing machine in cold. This made the paint fade a little in areas to give it more of that vintage feel.


This was a very cheap and easy makeover. I love it, do you?

Saturday, November 13, 2010

Blessings

Don't forget to ...

My gratitude list (in no particular order):


1. a wonderful family who I love immeasureably


2. good health (despite a little cold at the moment, helps keep me humble and grateful when I am feeling 100%)


3. internet (how did we ever live without it?) I love connecting with all of you and getting such inspirational ideas.

4. a hardworking, and patient husband who puts up with all my constant thrifting and decorating


5. cute kids who make me laugh (and cry) everyday


6. faith in knowing we are here for a reason and trying each day to be a better person

7. a comfortable house we call home--my heart goes out to those who want for things we often take for granted


8. Internet--oops, I guess I said that already


9. seasons--we actually have seasons here where I live, and are currently changing into winter (which I love at the moment, come February, however, I'll hate it)


10. friends--who build us up, inspire, encourage, and comfort us when times are tough--how could we every live without each other


I am blessed.


Monday, November 1, 2010

Faux Grain Sack Chair

Here is my latest project, a chair transformation.


Before: very, very ugly. This is even after I removed the very ugly and dirty fabric on the seat. I got a little excited about this redo and tore off the fabric before I remembered to take a picture. But trust me, it was a very dirty, red & white checked material--I couldn't get my hands on it fast enough.


I used about 3 coats of white paint, then added a very large number 6 to the front (picked to represent the number of people in our family). I just printed off the number, cut it out and traced using a pencil. Then filled it in with black paint.

I heavily distressed the chair by sanding, then using a walnut stain applied liberally. I didn't plan on staining so much at first, but when I saw up close my paint job in certain areas, I decided this would be better than having to do yet another coat of white paint.


For the fabric, I made my own faux grain sack fabric. Using basic muslin and some masking tape, I taped off varied stripes and filled in using a gray acrylic paint. Then pulled off the tape to reveal this ...