
Here's a peak at my Christmas tree.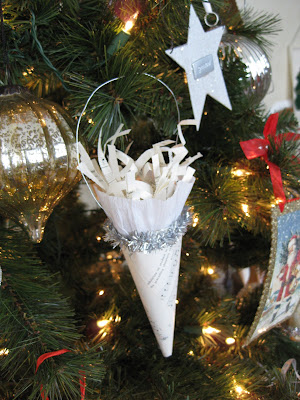 Lots of cream and silver with a touch of red.
 A handmade vintage Christmas cone: simple & quick.

Now that Thanksgiving is over, its time to start decorating for Christmas. I love to make some homemade ornaments every year. Growing up, our Christmas tree was filled with mostly homemade ornaments, made by either my mom, or the ones made by us kids at school. I love having homemade ornaments on the tree mixed in with the store bought kind.
Last year I changed my Christmas tree into a "vintage Christmas" theme. So it is somewhat bare and needs more stuff. I'll be getting busy filling it up. Here is idea #1:

These cones are a takeoff on the vintage sheet music wreath I completed just a few months ago. Just twist a sheet into a cone, embellish with some dollar store trim, and fill with even more sheet music (shredded this time). Hang with some wire and you're done!

Here it is step by step if you want to make some for yourself:
twist into a cone,

cut to make a flat top,

gather a strip of white crepe paper,

hot glue onto the inside of the cone,

add dollar store trim,

Simple, yet sweet, just the way I like 'em!

 Lots of cream and silver with a touch of red.
 A handmade vintage Christmas cone: simple & quick.
Now that Thanksgiving is over, its time to start decorating for Christmas. I love to make some homemade ornaments every year. Growing up, our Christmas tree was filled with mostly homemade ornaments, made by either my mom, or the ones made by us kids at school. I love having homemade ornaments on the tree mixed in with the store bought kind.
Last year I changed my Christmas tree into a "vintage Christmas" theme. So it is somewhat bare and needs more stuff. I'll be getting busy filling it up. Here is idea #1:

These cones are a takeoff on the vintage sheet music wreath I completed just a few months ago. Just twist a sheet into a cone, embellish with some dollar store trim, and fill with even more sheet music (shredded this time). Hang with some wire and you're done!

Here it is step by step if you want to make some for yourself:
twist into a cone,

cut to make a flat top,

gather a strip of white crepe paper,

hot glue onto the inside of the cone,

add dollar store trim,

Simple, yet sweet, just the way I like 'em!

Very pretty! I can't wait to see your tree all decked out! Have fun!
ReplyDeleteThose are really cute, great job!
ReplyDeleteI love these! They are so perfect for a vintage tree!
ReplyDeleteSo pretty. I love the way they give a little flare to the tree. Not to mention how all that white and cream really brightens up the dark green of the tree. I'm thinking I'm going to have to add some more white to my tree!
ReplyDeleteSo cute!
ReplyDeleteOh that is very pretty. I can see that with a little glass vial in it and some flowers tucked in too!.
ReplyDeleteDebbie
Love this idea. I think I will make them for the staff where I work and fill them with kisses! thanks for sharing, Marcia
ReplyDeletereally great cones. I will make some and fill with candy. I made cream satin ones with scented dried flowers wrapped in lace. Very pretty for victorian tree.
ReplyDeleteLove this idea. A great step-by-step simple tutorial. It's so great that the trim is from the $1 store! Can't wait to make these!
ReplyDeleteNJB
Hi Michele, can you let me know if you got my email about featuring you?
ReplyDeleteI made some cones like this a few years ago for our local historical society tree-they're so neat!
ReplyDeleteThe cones are darling...and so is your tree. It sounds a lot like mine. I think I have every crafty ornament my kids ever made. They mean more to me than all the rest.
ReplyDeleteThanks for the tutorial on the cone. I'm definitely going to try it!
XO,
Jane
Hi Michele!
ReplyDeleteI found your blog from the Cozy Little House. I'm putting you on my blog list because I don't want to miss another one of your great projects, I love, love the chairs you have done they are fabulous and also the cone ornament:)
Rondell
I'm visiting via Brenda at Cozy Little House--she's the best. Love your little cone ornaments. Happy holidays!
ReplyDeleteSusan
Hi Michelle, love your little cone ornament... xoxo Julie Marie
ReplyDeleteI love your cone ornaments, their so adorable... thanks so much for the tutorial!!!
ReplyDeleteBlessings~~~ Daphne
Oh Friend,
ReplyDeleteThanks for sharing your lovely paper cone with us, it's delightful!
Hope your Holiday is a Blessed one!!
Smiles,
Susie
I love this! It is very pretty!!
ReplyDeleteSo cute and sweet--thanks for linking up!
ReplyDeleteToo clever.....simple and inexpensive.
ReplyDeleteXo
Jo
Very Cute! I just may use these for party favors for my daughters birthday! I think she and her friends will feel very special with those! Thanks for the inspiration!
ReplyDeleteLacy
Hi Michelle, your cones are so sweet and very vintage, love that you gave us a step by step.
ReplyDeleteThanks for linking up with VIF!
hugs,
Debra
Love the cone ornament ~ Thanks for sharing the directions....
ReplyDeleteCheryl
I adore your cones with the addition of a ruffle and some glittery garland. Beautiful job.
ReplyDeleteVery Beautiful!! Simple, festive, and fresh. Thanks so much for linking to SFS this week...be sure to link up next week for the Christmas challenge for a prize. :) shaunna
ReplyDeleteVery cute - I like a little bit of sparkle!
ReplyDelete